
Build Your Own Free Website Part 3 - Create a Blog
Part 1and Part 2I will continue to create a homepage, and if you have accessed part 3 right away, please watch parts 1 and 2 back to back and follow along using RStudio, and then come back to this article.
In this post, we're going to create a blog-like page within the homepage. If you follow along, you'll be able to do it. Remember, coding is something you get used to. (Actually, I'm not sure I'd call what we're doing coding.) Anyway, follow along with me as I create a blog-style page, which I've implemented in the quarto site below.

Setting up the homepage YAML file
First, click on the _quarto.yml file in the root folder to open the source code editing window. Then enter the code below, making sure to match the '-' position with the '-' at the top. This will insert the Blog menu into the navigation bar and open the blog page when clicked. If you look at the href address, you'll notice that we need to create a docs folder in the root folder, a blog folder under that, and then an index.qmd file (am I the only one with an animalistic sense?).
      - text: "Blog"
        href: docs/blog/index.qmd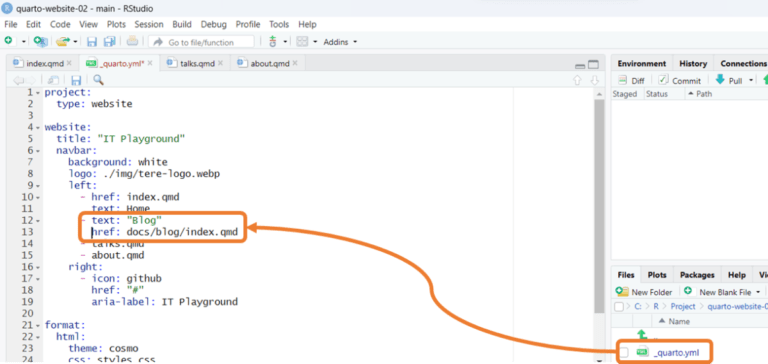

Setting up index.qmd in the blog folder
For the page that will be displayed when you click the Blog menu in the navbar, create an index.qmd inside the blog folder as shown below and enter the following source code into that file and save it. Of course, you can change the title and subtitle to whatever you want.
---.
title: IT Playground Blog
subtitle: News, tips about R & Python & AI
listing:
  sort: "date desc" # Blog newest posts at top
  contents: "posts"
  sort-ui: false
  filter-ui: false
  categories: true
  feed: true
page-layout: full
margin-header: signup.html
title-block-banner: "#EDF3F9"
title-block-banner-color: body
search: false
---.
Setting up signup.html in the blog folder
You set up the root folder/docs/blog/index.qmd in the step above. Now, when you publish a new post to your blog, you'll want to send a notification to your registered email address to check for updates. Subscription service settingsActually, this is something that you'll need to study your service provider's solution for, so just a note. Actually, I also need to study this part... Let's focus on formatting first (I'll try to post about it later.) If you're in a hurry, here's a service for you~. Hereto see it~)
In the blog folder, create a singup.html(Not singing at the top of your lungs!! Watch your word spelling!) Create signup.html and copy and paste the source code below into that file.
<!-- Begin Mailchimp Signup Form -->
<div id="mc_embed_signup" style="padding-bottom: 1em; max-width: 400px;" class="ms-auto me-auto">
<p style="font-weight: 600; margin-bottom: 0;">Subscribe</p>
<span style="font-size: 0.9em;">Enjoy this blog? Get notified of new posts by email:</span>
<form action="https://quarto.us14.list-manage.com/subscribe/post?u=c79fb56a311ae347fbe916740&id=ec05dfca03" method="post" id="mc-embedded-subscribe-form" name="mc-embedded-subscribe-form" class="validate" target="_blank" novalidate>
<div id="mc_embed_signup_scroll">
<div class="input-group mt-1 mb-2">
<input type="email" class="form-control" placeholder="Email Address" aria-label="Email Address" name="EMAIL" style="font-size: 0.8em; padding: .2em;">
</div>
<div id="mce-responses" class="clear foot">
<div class="response" id="mce-error-response" style="display:none"></div>
<div class="response" id="mce-success-response" style="display:none"></div>
</div> <!-- real people should not fill this in and expect good things - do not remove this or risk form bot signups-->
<div style="position: absolute; left: -5000px;" aria-hidden="true"><input type="text" name="b_c79fb56a311ae347fbe916740_ec05dfca03" tabindex="-1" value=""></div>
<div class="optionalParent">
<div class="clear foot" style="display: flex; align-items: center; justify-content: center;">
<input type="submit" value="Subscribe" name="subscribe" style="min-width: 150px; font-size: 0.8em;" id="mc-embedded-subscribe" class="button btn btn-light btn-sm ms-auto me-auto">
</div>
</div>
</div>
</form>
</div>
<!--End mc_embed_signup-->
Setting up the YAML file in the posts folder
Next, create a posts folder inside the blog folder for the default settings for posts. Then create a file named _metadata.yml inside the posts folder and copy and paste the source code below into that file.
Comments:
  giscus:
    repo: quarto-dev/quarto-web
    category: Blog
title-block-banner: "#EDF3F9"
title-block-banner-color: body
toc-location: left
format:
  html:
    include-after-body:
      - ../signup.html
search: false
Try a real post
Now let's do the actual posting. Create a folder with the text that will go in the url address inside the posts folder. Here, we'll use 2024-01-24-first-post Create a folder named index.qmd and create an index.qmd file in it, and copy and paste the source code below. Then, run the render to localhost and click the Blog menu on the website, and you can see the first post is completed as shown below. (Note that the image doesn't appear because I didn't work on it separately, but I'll work on it later.
---.
title: Blog Listing Success
subtitle: This is my first post.
description: |
  It's harder than you think, but it's fun...
categories:
  - Quarto
  - study
author: TERE
date: "01/24/2024"
image: "success.jpg"
image-alt: "Image of a child succeeding."
---.

It's more complicated than it sounds, but it's fun.
So what if we want to post a second time? If you have a hunch, you can create another post folder inside the posts folder and create and render an index.qmd in that folder.

As you work on the first and second posts, do you see how the title, subtitle, description, categories, author, and data in the code source window render and match what you see in your website's blog menu? One thing more than anything else, Categories Do you see posts grouped into Authoring, Features, etc.? If you click on the list in the middle-right corner of the rendered Blog menu under Categories, you can filter to see only blogs that match that keyword.
I tried to keep it short and easy to understand today, but it turned out to be long. lol
Until the day when life is full of imitations! secondlife.lol by Terrywas.
Thank you~!
Add 1. Insert a picture in the post list (thumbnail format)
Let's add thumbnail images to our posts as they are listed in our website's blog menu. We'll use the first post folder we created (2024-01-24-first-post), then open the index.qmd file and add a thumbnail picture to the image and image-alt for that figure. That's it. It's easier than you think, isn't it? You need image-alt for text to replace the picture when it doesn't show up for some reason.

Add 2. Insert a picture in your post
To insert a picture into your post content, you can use the picture uploaded above. Simply copy the source code below and paste it into the post content wherever you want. This is easy enough, right? Of course, you'll need to change the picture filename (success.jpg) and fig-alt to something different from the source code below.
{.preview-image fig-align="center" fig-alt="This is an image of a child succeeding."}
All content on 'secondlife.lol' is protected by copyright law. Unauthorized reprinting, copying, distribution, etc. is prohibited.


